Creating CEF Automation Test Project
CEF (Chromium Embedded Framework) has become a popular choice in today's desktop application development because it allows developers to embed web technologies into traditional desktop applications. However, this also raises a question: how to perform automated testing of CEF applications? This article will guide you through completing this task using CukeTest.
CukeTest has chosen a Selenium-based implementation approach. By connecting to the CEF application's debug port, we can directly interact with the application to achieve accurate and efficient testing.
Preparation
Before starting to write automated tests, we need to complete some preparatory work.
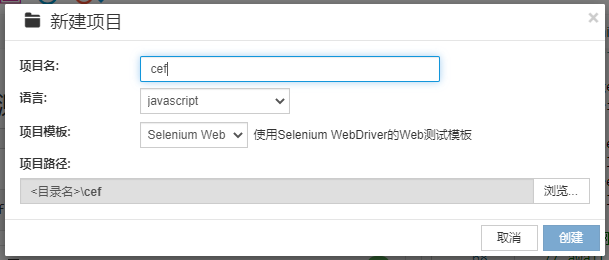
1. Project Creation
Open the CukeTest client and create a project. Note that the project template selected is the Selenium Web template. After the project is created, the project homepage will automatically open.
2. Determine CEF and Chromium Versions
Before starting, you need to know the specific version of your CEF application. For example, the CEF version might be: 81.3.10+gb223419. This version corresponds to Chromium version: 81.0.4044.138. Understanding this version information is very important for the subsequent installation of tools and drivers.
You can find the corresponding version information on CEF's historical versions page. On this page, you can find various CEF versions and view their corresponding Chromium versions. This way, you can ensure you get the correct version information, allowing you to download and install the correct selenium-webdriver and chromedriver in subsequent steps.
3. Install the Appropriate selenium-webdriver Version
Based on the Chromium version, you need to determine and download the appropriate selenium-webdriver version. In this example, for Chromium version 81.0.4044.138, the recommended selenium-webdriver version is 4.0.0.
You can use the following command in CukeTest's command line to install:
npm install selenium-webdriver@4.0.0pip install selenium==4.0.04. Install the Corresponding chromedriver Version
Similar to selenium-webdriver, you also need to install the chromedriver version corresponding to your CEF and Chromium versions. In our example, the recommended chromedriver version is 81.0.0.
You can use the following command to install:
npm install chromedriver# Place the corresponding version of chromedriver.exe in CukeTest's python directory, for example: C:\Program Files\LeanPro\CukeTest\pyapiDeveloping Web Automation Scripts
Next, we need to obtain the actual web page address inside the CEF application and complete the writing of automation scripts for the web page.
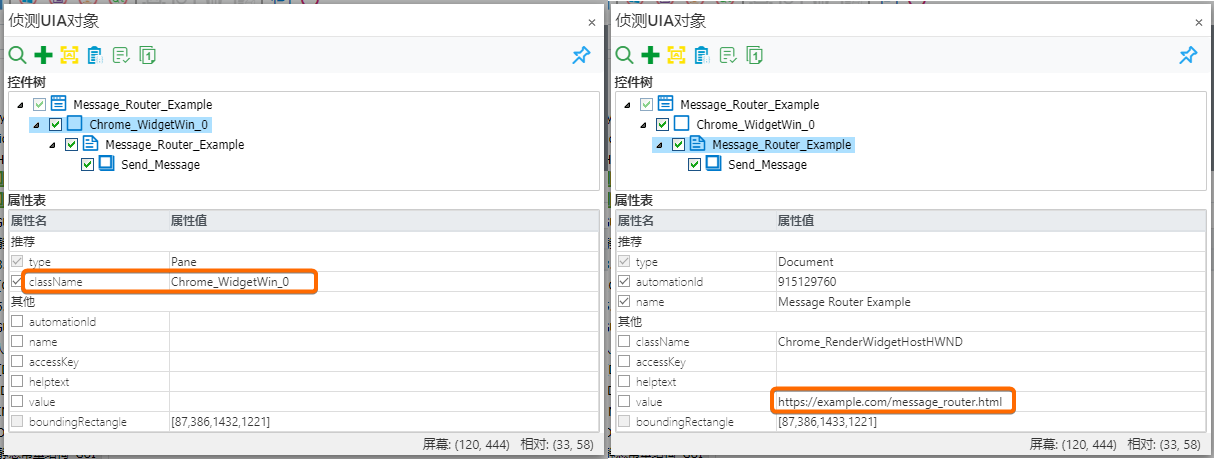
1. Spy on CEF Controls
First, open CukeTest's Model Manager. Use the Windows control spy feature to find the control area of the CEF application. In the control object's properties, find the control with ClassName prefixed with Chrome_WidgetWin_, which is exactly the CEF control we need. Its next level is a Document control, which represents the HTML content loaded in the CEF application. Check the value of this control, and you will see the URL of the target web page, which can be a local path or an online address.
2. Record Operations Using a Browser
To record operations on the built-in page of the CEF application, you need to open the target web page URL you obtained earlier in a common browser, such as Chrome or Firefox.
- Open Browser: Launch Chrome or Firefox.
- Access CEF Application: Enter the URL obtained from the CEF control properties in the browser's address bar.
- Start Recording: Use Selenium IDE or other recording tools to start recording your operations. During this process, you can simulate user behavior, such as clicking buttons, filling out forms, etc.
- Save and Export Script: After completing the recording, save your operations and export them as a script.
3. Manually Write Operation Scripts
Of course, not all operations are easy to capture through recording tools. Sometimes, complex operations and validations may need to be implemented by manually writing scripts. You can manually write these scripts using the APIs provided by Selenium, for example, locating page elements, executing clicks, validating element properties, etc. Manually writing scripts provides greater flexibility, especially for some complex operations that are not easy to record.
In summary, whether through browser recording or manual writing, you should obtain an automated test script for web page elements in the CEF application. This script can be integrated into your CukeTest project and used for subsequent test execution.
Recording Web Page Operations
After the above work is completed, we can start writing automated tests for the CEF application.
1. Launch CEF Application and Set Debug Port
First, ensure that your CEF application sets a specific debug port when starting. This will allow Selenium to connect to the application and execute automation scripts. For example, you might need to use the following command to start your CEF application (using --remote-debugging-port=8091 as an example):
Util.launchProcess(executablePath, "--remote-debugging-port=8091");Util.launchProcess(executablePath, "--remote-debugging-port=8091")2. Connect to CEF Application via Selenium
Once the CEF application is started and listening on the debug port, you can use Selenium to establish a connection. Make sure the connection port matches the port the CEF application started with.
const { Builder } = require('selenium-webdriver');
let driver, handles;

const options = {
    browserName: 'chrome',
    'goog:chromeOptions': {
        debuggerAddress: 'localhost:8091' // CEF application's debug address
    }
};

driver = new Builder()
    .withCapabilities(options)
    .forBrowser('chrome')
    .build();

handles = await driver.getAllWindowHandles();
const newPageHandle = handles[1]; // Find the page to operate on, in actual applications a function is needed to help determine this
options = webdriver.ChromeOptions()
options.add_experimental_option("debuggerAddress","127.0.0.1:8091")
driver = webdriver.Chrome(options=options)3. Script Integration
In this step, you need to introduce the CEF control operation scripts you recorded or manually wrote earlier. These scripts typically define how to interact with various elements in CEF, such as clicking buttons, filling out forms, scrolling pages, etc.
For example, you might have Selenium operations like the following:
await driver.get("http://yourCEFAppURL")
let element = await driver.find_element_by_id("loginButton")
await element.click()driver.get("http://yourCEFAppURL")
element = driver.find_element_by_id("loginButton")
element.click()Running
After all the preparation and development work is completed, we can directly run our automation test project in CukeTest. If everything goes well, you will see the CEF application automatically execute operations according to your script content and generate a test report in CukeTest.