Descriptive Mode
Descriptive Mode is a way to construct test objects directly in code using their properties. Unlike the traditional approach of loading test object through an object model, this mode allows you to dynamically obtain objects via methods such as WinAuto.getWindow() or WinAuto.getButton(). These get[ControlType] methods take an object that contains a set of attributes, which are logically combined using “AND” to define the search criteria for locating the control in the interface.
The advantage of Descriptive Mode is that it does not rely on an object model—test objects can be created dynamically or used to access controls that appear at runtime. However, the drawback is that test objects cannot be centrally managed or modified within the Model Manager interface, which may increase maintenance costs.
Therefore, you can choose to use Descriptive Mode depending on your specific testing scenario.
Constructing Test Objects from Attributes
The following example demonstrates how to construct test objects directly from attributes without loading an object model:
const { WinAuto } = require('leanpro.win');

await WinAuto.getWindow({ "className": "ApplicationFrameWindow", "title": "Calculator" })
  .getWindow({ "className": "Windows.UI.Core.CoreWindow", "title": "Calculator" })
  .getGeneric({ "type": "Group", "automationId": "NumberPad", "name": "Number Pad" })
  .getButton({ "automationId": "num5Button" }).click();
from leanproAuto import WinAuto
WinAuto.getWindow({"className": "ApplicationFrameWindow","title": "Calculator"}).getWindow({"className": "Windows.UI.Core.CoreWindow","title": "Calculator"}).getGeneric({"type": "Group","automationId": "NumberPad","name": "Number Pad"}).getButton({"automationId": "num5Button"}).click()In this example, each method call takes an object parameter that contains key-value pairs. Together, these pairs define the filtering criteria used to locate the test objects.
Omitting Intermediate Hierarchies
If the target control has a unique identifier, you can omit intermediate hierarchies and directly link the top-level window to the target control, as shown below:
const { WinAuto } = require('leanpro.win');

await WinAuto.getWindow({ "className": "ApplicationFrameWindow", "title": "Calculator" })
  .getButton({ "automationId": "num5Button" }).click();
from leanproAuto import WinAuto
WinAuto.getWindow({ "className": "ApplicationFrameWindow", "title": "Calculator" }).getButton({ "automationId": "num5Button" }).click()In this case, because the button “5” has a unique automationId, intermediate objects can be omitted for a simpler and clearer code structure.
Passing Multiple Attributes at Once
In Descriptive Mode, you can use the getGeneric() method to pass an array of attributes at once, which helps avoid deep hierarchical calls. This approach is useful when you need to locate several nested controls in sequence.
💡 Tip: In the Model Manager’s Object Attributes tab, click “Copy Cascaded Node Properties” to automatically copy the attributes of the selected control and its parent objects as an array, ready for direct use in your script.
Example Code
The following examples show three different methods—object recognition, pattern control, and virtual control—for locating and clicking the “5” button in Descriptive Mode:
const { WinAuto } = require('leanpro.win');

// Method 1: Object Recognition
await WinAuto.getGeneric([
    { "type": "Window", "className": "ApplicationFrameWindow", "title": "Calculator" },
    { "type": "Window", "className": "Windows.UI.Core.CoreWindow", "title": "Calculator" },
    { "type": "Group", "automationId": "NumberPad", "name": "Number Pad" },
    { "type": "Button", "automationId": "num5Button", "name": "Five" }
]).click();

// Method 2: Pattern Control
let parent_widget = WinAuto.getGeneric([
    { "type": "Window", "className": "ApplicationFrameWindow", "title": "Calculator" },
    { "type": "Window", "className": "Windows.UI.Core.CoreWindow", "title": "Calculator" },
    { "type": "Group", "automationId": "NumberPad", "name": "Number Pad" }
]);
await parent_widget.getPattern({ "imagePath": "path_to_pattern_5.png" }).click();

// Method 3: Virtual Control
await parent_widget.getVirtual({ "type": "Virtual", "boundingRectangle": "80,50,78,48", "align": 0 }).click();
from leanproAuto import WinAuto
# Method 1: Object Recognition
WinAuto.getGeneric([
{ "type": "Window", "className": "ApplicationFrameWindow", "title": "Calculator" },
{ "type": "Window", "className": "Windows.UI.Core.CoreWindow", "title": "Calculator" },
{ "type": "Group", "automationId": "NumberPad", "name": "Number Pad" },
{ "type": "Button", "automationId": "num5Button", "name": "Five" }
]).click()
# Method 2: Pattern Control
parent_widget = WinAuto.getGeneric([
{ "type": "Window", "className": "ApplicationFrameWindow", "title": "Calculator" },
{ "type": "Window", "className": "Windows.UI.Core.CoreWindow", "title": "Calculator" },
{ "type": "Group", "automationId": "NumberPad", "name": "Number Pad" }
])
parent_widget.getPattern({ "imagePath": "path_to_pattern_5.png" }).click()
# Method 3: Virtual Control
parent_widget.getVirtual({ "type": "Virtual", "boundingRectangle": "80,50,78,48", "align": 0 }).click()Notes
- The properties passed to
getGeneric()must all belong to the same technology type (Windows, Qt, Java, etc.). - If the target control contains Pattern Controls or Virtual Controls, retrieve the parent control first with
getGeneric(), and then call the appropriate method.
Using Saved Object Attributes from a Model
By default, the first parameter specifies the object name, and the second defines its identification attributes. For available attribute options, see the Criteria class.
- Object Name Parameter: Retrieves the object together with its predefined attributes from the model.
- Identification Attributes Parameter: Used to override or add properties to the existing object for locating purposes.
Overriding Existing Identifiers
Example:
await model.getButton("Five", { automationId: "num6Button" }).click();model.getButton("Five", { "automationId": "num6Button" }).click()In this example, the script first retrieves the button “Five” from the model, then overrides its automationId with "num6Button". As a result, the button that is clicked is actually “6” instead of “5”.
Adding Attributes Dynamically
Example:
await model.getButton("Button", { index: 2 }).click();
model.getButton("Button", { "index": 2 }).click()
This code clicks the third button (assuming there are at least three matching buttons). It works similarly to inheritance — new attributes extend the object's definition.
Building Leaf Nodes Dynamically
You can also combine the model with Descriptive Mode to simplify code structure, especially for dynamically generated controls such as treeItem or tableItem.
await modelWin.getList("ListBox").getListItem({
   "type": "ListItem",
   "className": "ListBoxItem",
   "name": "First Normal Item"
}).click();modelWin.getList("ListBox").getListItem({
"type": "ListItem",
"className": "ListBoxItem",
"name": "First Normal Item"
}).click()This code first retrieves the ListBox, then dynamically locates the ListItem and clicks the entry named “First Normal Item”.
Descriptive Mode for Virtual Controls
Sometimes, the child elements of a control cannot be recognized or are created dynamically. In such cases, Descriptive Mode can be combined with Virtual Controls.
For instance, in a List control, each item may have a “Delete” button that is drawn programmatically and not a real UI element. You can use Descriptive Mode to get the listItem and then define a virtual control within its area to click the “Delete” button.
await model.getListItem({"name":"group1"})
  .getVirtual({"boundingRectangle":"0,0,16,16","align":1})
.click();model.getListItem({"name":"group1"}) \
.getVirtual({"boundingRectangle":"0,0,16,16","align":1}) \
.click()Explanation:
getListItem(): Retrieves the list item by property{ "name": "group1" }.getVirtual(): Defines a 16×16 virtual region within thelistItem.- The
alignparameter controls the alignment:0Top-left1Top-right2Bottom-left3Bottom-right
Use Cases for Virtual Controls in Descriptive Mode:
- Dynamic Controls — list or table items that change at runtime.
- Unrecognizable Child Controls — custom-drawn or graphical UI elements.
- Cross-Platform Compatibility — works with Windows, Qt, and other technologies.
This approach is ideal when precise interaction within a control’s subregion is required and is generally more maintainable than using raw coordinates.
Code Generation
Descriptive Mode code can be written manually, but it is usually more convenient to generate it through the Model Manager.
Generating Operation Code
- Select a Control — In the Model Manager, choose the control to operate on.
- Switch Tabs — Go to the corresponding Control Operations tab.
- Enable Descriptive Mode — Click the Descriptive Mode switch
 ; when pressed, it indicates that the mode is enabled.
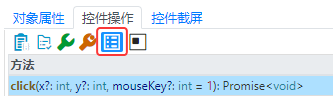
The copied operation code will now be in Descriptive Mode.
Generating Object Locator Code
Node Properties
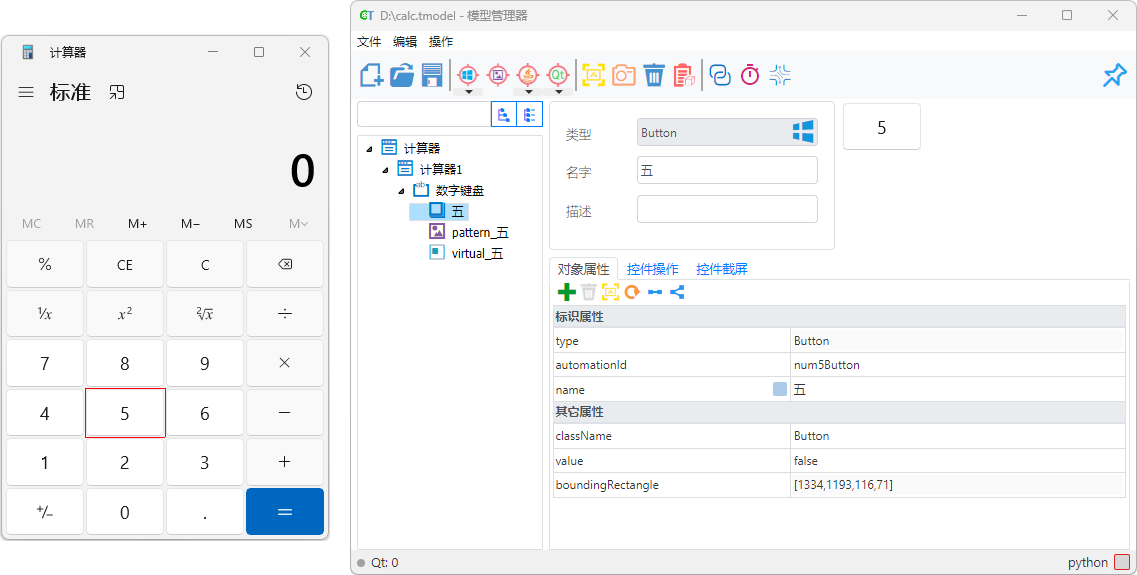
In the Object Attributes tab of the Model Manager, click the Copy Node Properties to copy the control’s information as a JSON object. The copied content can be directly passed as a parameter to a get[ControlType] method.
Example:
{"type": "Button", "automationId": "plusButton", "name": "Add"}
Cascaded Node Properties
In the same tab, click Copy Cascaded Node Properties to copy the control and all of its parent-node information as an array. This array can be used directly as parameters for getGeneric() when passing attributes in bulk.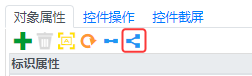
Example:
[
   {"type": "Window", "className": "ApplicationFrameWindow", "appName": "ApplicationFrameHost"},
   {"type": "Group", "automationId": "StandardOperators", "name": "Standard Operators"},
   {"type": "Button", "automationId": "plusButton", "name": "Add"}
]
Generating Descriptive Code During Control Detection
When adding a control, after detection, click Copy Code in the Add Object dialog to copy the generated Descriptive Mode code to the clipboard (by default, this will generate a click() action).