Implementing BDD Automation with JavaScript
CukeTest has built-in support for Cucumber, allowing you to write BDD automation test scripts using JavaScript.
Basic Concepts of Cucumber
In Behavior Driven Development (BDD), Cucumber uses Gherkin scenario files written in natural language, making test content easy to understand and facilitating team communication. Typically, a Cucumber JavaScript project contains two files:
- Scenario File: Describes the specific steps and expected behaviors of test scenarios, located in the
featuresdirectory. - Step Definition File: Implements the specific operations of each step in the test scenario, guiding the actual execution of the automated test.
What is a Step Definition File? Why Do We Need It?
The step definition file is the core of implementing test scenario behaviors. It converts steps in the Gherkin scenario file into executable code. Each step is implemented by a corresponding function, ensuring that the test runs automatically in the specified order and content. Below we will detail how to create a step definition file and write automation code for each test step.
1. Create a Step Definition File
First, create or open a JavaScript file in the features/step_definitions directory of your project. Usually, a definitions1.js file is automatically generated when creating a project. You can also create a new step definition file anywhere under the features directory, such as notepad.js. Ensure that Cucumber's step functions are imported in the file:
const { Given, When, Then } = require('cucumber');2. Auto-Generate Code Snippets
CukeTest provides a convenient code snippet generation function that can generate corresponding code snippets for each step. To generate code snippets, please ensure the Gherkin file is in Visual Mode, and then click the gray button  to the right of the step. At this point, the corresponding code snippet will be automatically inserted into your currently open JavaScript file:
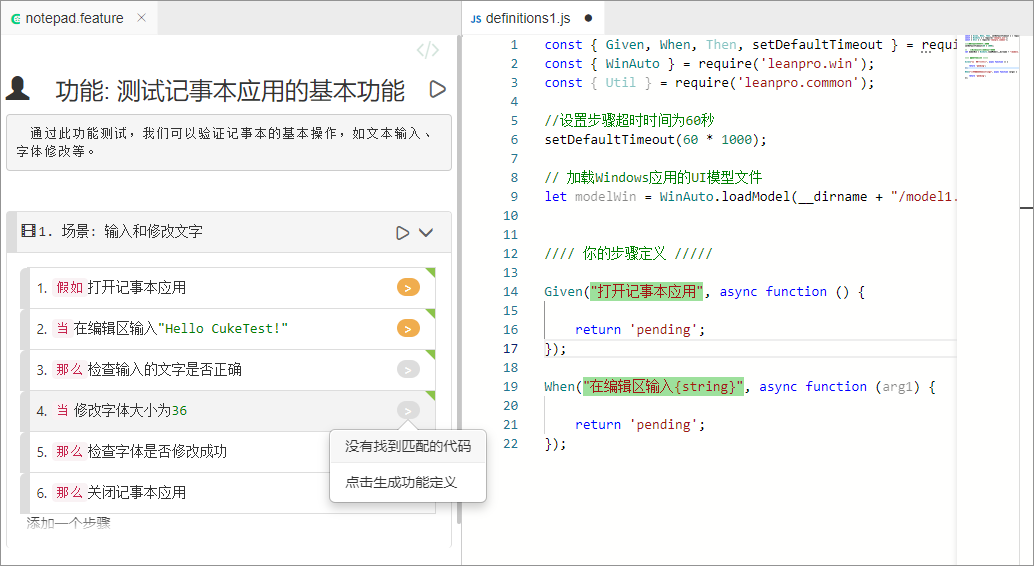
For our Sample Scenario, the generated code snippets are as follows:
Given("Open Notepad application", async function () {
    return 'pending';
});

When("Enter {string} in the editing area", async function (arg1) {
    return 'pending';
});
You can further implement specific operations for each step directly on the code snippets.
3. Implement Step Definition Functions
Step definition functions are the specific code used to execute automated tests, implementing various operations in the scenario. Through the previous Recording Script, we have already generated all the automation operation codes and checkpoint codes needed for this test scenario. Next, we just need to copy the recorded codes into the step definition functions in the order of the operation steps and make corresponding modifications.
Tip: For desktop automation testing, when writing step definition functions, you need to ensure that the desktop automation module (e.g.,
WinAuto) and the corresponding Model File have been loaded.
1. Write Parameterless Step Functions
Parameterless steps are usually used to perform a single operation, such as "Open Notepad application". The sample code is as follows:
Given("Open Notepad application", async function () {
    await Util.launchProcess("C:\\Program Files\\LeanPro\\CukeTest\\bin\\notepad.exe");
});
This code will launch the Notepad application during the test.
2. Write Step Functions with Parameters
For steps containing parameters, you can use placeholders {string} or {int} to define variable parameters, which will be automatically passed to the function. For example, the step "Enter text in the editing area":
When("Enter {string} in the editing area", async function (text) {
    await modelWin.getEdit("QTextEdit").set(text);
    this.text = text; // Save text for use in subsequent steps
});Tip: The
textparameter here will be passed and saved tothis.text, facilitating its use in subsequent steps.
3. Pass Data Between Steps
By storing data in the this object, you can share data between different steps. For example, in the following code, the this.text variable is used to verify the input text:
Then("Check if the entered text is correct", async function () {
    await modelWin.getEdit("QTextEdit").checkProperty("Text.text", this.text);
});
Complete Step Definition File Example
Below is a complete step definition file example showing how to implement the basic automation operations of the Notepad application through multiple steps:
const { Given, When, Then } = require('cucumber');
const { WinAuto } = require('leanpro.win');
const { Util, RunSettings } = require('leanpro.common');
RunSettings.set({ slowMo: 1000, reportSteps: true });
let modelWin = WinAuto.loadModel(__dirname + "/notepad.tmodel");
Given("Open Notepad application", async function () {
await Util.launchProcess("C:\\Program Files\\LeanPro\\CukeTest\\bin\\notepad.exe");
});
When("Enter {string} in the editing area", async function (text) {
await modelWin.getEdit("QTextEdit").set(text);
this.text = text;
});
Then("Check if the entered text is correct", async function () {
await modelWin.getEdit("QTextEdit").checkProperty("Text.text", this.text);
});
When("Change font size to {int}", async function (size) {
await modelWin.getButton("Font").click();
await modelWin.getList("QFontListView").select(size.toString());
await modelWin.getButton("OK").click();
});
Then("Check if the font is modified successfully", async function () {
await modelWin.getVirtual("QTextEdit_image").checkImage();
});
Then("Close Notepad application", async function () {
await modelWin.getButton("Close").click();
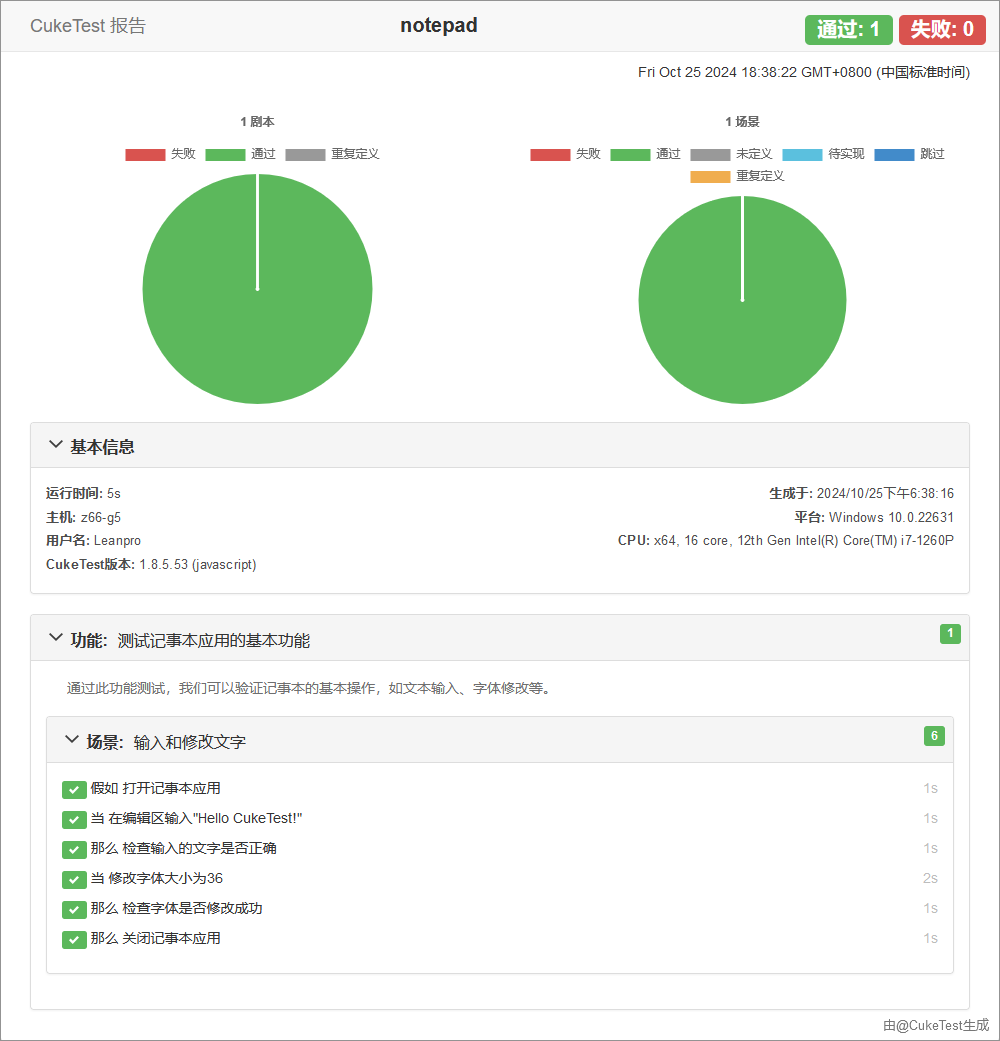
});4. Run Test Project and View Report
In CukeTest, you can directly execute test cases via the Run Project button on the project interface. After test execution, you can view the detailed test report.
If you need to insert custom information such as screenshots into the report, please refer to: Report Attachments