ATK Recording Options
CukeTest provides ATK recording options for Linux desktop Qt and GTK applications, allowing users to easily generate automated test scripts.
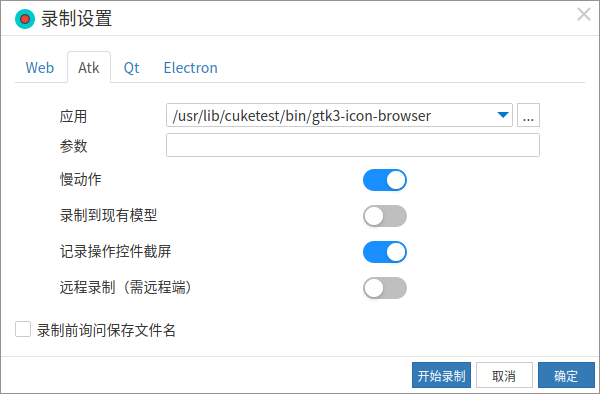
Linux Desktop Applications
In the "Application" field, you can specify the path of the Linux desktop Qt or GTK application to be tested. When recording starts, if a path is provided, the application will be automatically launched. You can also leave it empty and manually start the application via the menu Tools -> Launch Application... after recording begins. Either way, the generated script will include the code to launch the Linux desktop Qt or GTK application.
If you manually open the Linux desktop Qt or GTK application before starting the recording, no launch code will be generated in the script.
Command-Line Arguments
In the "Arguments" field, you can enter any command-line parameters required to start the target Linux desktop Qt or GTK application. These parameters will be passed to the application and can include file paths, configuration options, or any other supported arguments.
Slow Motion
The slow motion option increases the interval between operations during playback. This is useful for observing and debugging recorded scripts. Enabling this option will add the slowMo setting to the generated script, with a default value of 1000 milliseconds (i.e., a 1-second delay between each operation).
In the script, it is set as follows:
const { RunSettings } = require("leanpro.common");
RunSettings.slowMo = 1000;
from leanproAuto import RunSettings
RunSettings.set({"slowMo": 1000})Record to Existing File
If you do not want to create a new recording but instead want to append or continue recording based on a previous session, you can use this option. When checked, you will need to fill in the following two fields in the popup window:
Model File: Append the generated control model to the selected *.tmodel file instead of creating a new one.
Script File: Append the generated script to the selected script file (Python or JavaScript) instead of creating a new script file.
Capture Screenshots of Operated Controls
This option captures screenshots of the operated controls. These screenshots can be viewed by clicking on each control in the Model Manager (note that the container of the control is not captured). This is useful for debugging, as you can quickly locate the operated control by viewing its screenshot.