Recording Your First Automation Script
This section uses the Windows recording function as an example to detail the entire process from project creation to script recording and playback. For other types of application recording (such as: Qt, Java, ATK, Electron, Web), the methods and steps are the same.
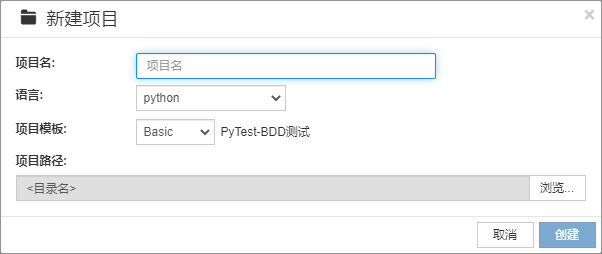
1. Create a New Project
- Open the CukeTest client, and you will see a welcome page. Click the New Project button on the page.
- Next, name your project. For example, you can enter
notepad-test, which is a simple Notepad automation test project we are about to record. - In the project template options, select the Windows template. You can choose to use the programming language you are familiar with:
JavaScriptorPython. Click the Browse button to select the location to save the project, and then click Create.
After creation, CukeTest will automatically open the project.
2. Record Your Automation Script
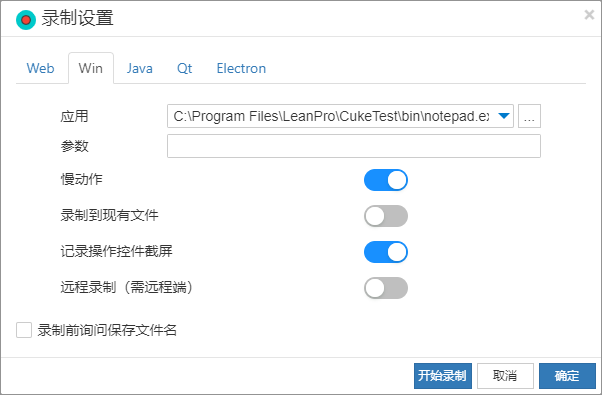
1. Set Recording Parameters
On the toolbar of the CukeTest main interface, you will see a recording button. Click the small arrow next to the recording button to enter the Recording Settings interface. Here you need to select the Windows recording mode.
- In the Application Path input box, fill in the path of the application to be tested. For example, the default path for Notepad is:
C:\Program Files\LeanPro\CukeTest\bin\notepad.exe. Other settings can be kept as default and do not need to be modified.
2. Start Recording
Click the Record button, and CukeTest will automatically launch notepad.exe. At this point, all your operations in the application under test (such as clicking, inputting content) will be automatically recorded.
Tip: The recording function is very intuitive, and every step of your operation will be captured and generated into a script. Remember to perform operations in order so that the recorded script is more coherent.
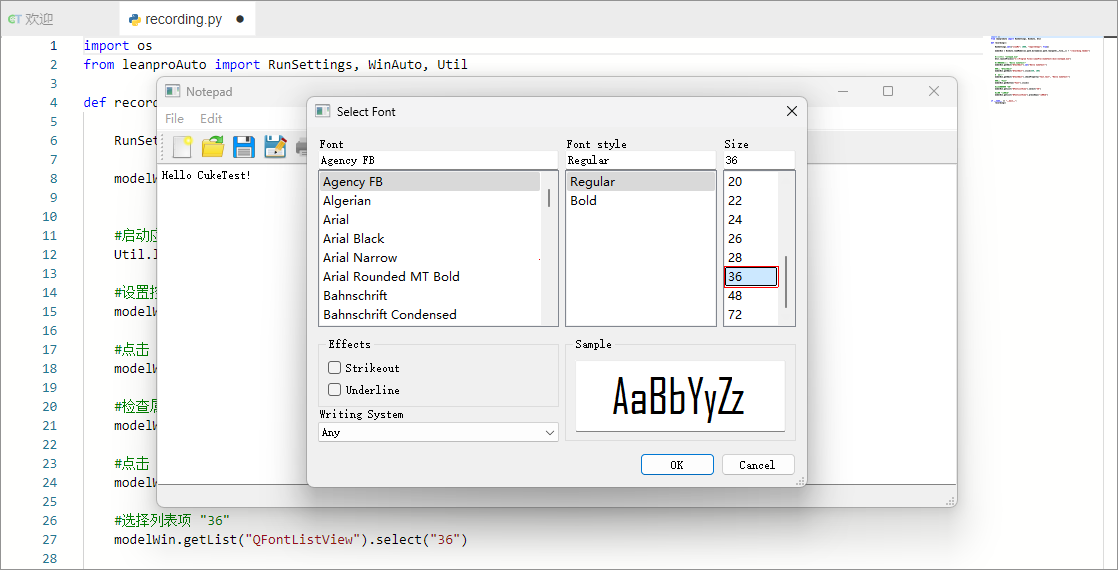
3. Perform Test Operations
Manually complete the following operations according to the test scenario:
- Open the Notepad application.
- Enter "Hello CukeTest!" in the editing area.
- Verify that the entered text is correct.
- Change the font size to 36.
- Verify that the font size has been changed successfully.
- Close the Notepad application.
During the recording process, CukeTest will automatically generate corresponding operation scripts.
4. Add Checkpoints
During recording, we usually need to verify whether the operation was successful, such as whether the input text is correct or whether the font modification was successful. These verification points are called Checkpoints. We need to add two checkpoints for the above operations:
How to quickly open the checkpoint dialog
During recording, you can hold down the
Altkey and right-click the control you want to verify. This can quickly open the checkpoint dialog, or you can add checkpoints via the checkpoint button on the recording toolbar.Add the first checkpoint
The first checkpoint is used to verify the text content in the
QTextEdittext editing control. We want to confirm whether the text isHello CukeTest!.- In the property checkpoint, select the
Text.textproperty. - After confirming its value is
Hello CukeTest!, click theConfirmbutton. The system will automatically generate the following script:
- In the property checkpoint, select the
await model.getEdit("QTextEdit").checkProperty("Text.text", "Hello CukeTest!")modelWin.getEdit("QTextEdit").checkProperty("Text.text", "Hello CukeTest!") 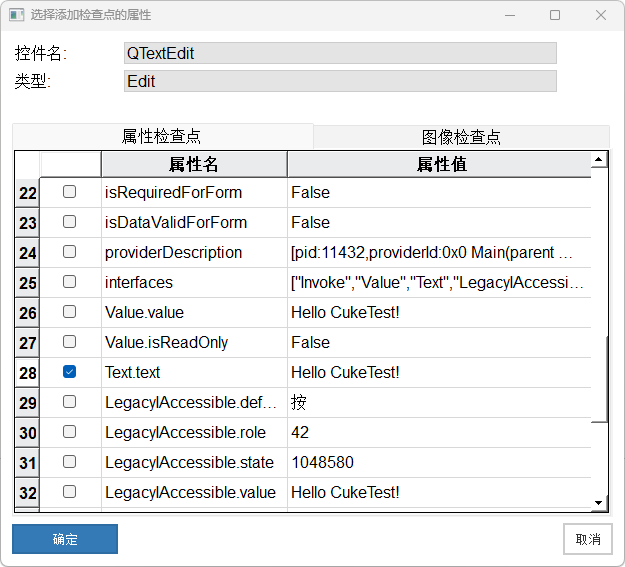
Add the second checkpoint
The second checkpoint is used to verify whether the font has been modified successfully. Here we can use the image checkpoint function to verify the appearance of the control.
- In the checkpoint dialog, switch to the Image Checkpoint tab.
- Check the image to be verified, click
Confirm, and the system will automatically generate the script:
await modelWin.getVirtual("QTextEdit_image").checkImage();modelWin.getVirtual("QTextEdit_image").checkImage() 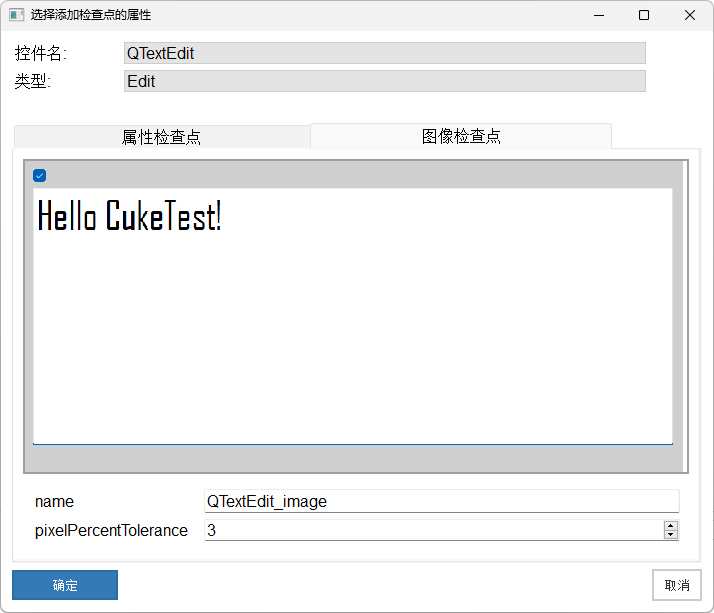
With these checkpoints, you can ensure that every step of the operation is verified when the script runs.
Tip: Checkpoints can greatly improve the accuracy of testing. Property checkpoints are used to verify certain properties of controls (such as text), while image checkpoints are used to verify control appearance.
5. Finish Recording
When you have completed all operations, close Notepad and click the Stop button in the CukeTest toolbar to end recording. After recording is complete, CukeTest will automatically generate the corresponding test script.
3. Playback the Recorded Script
After recording is complete, you need to verify whether the script is correct through Playback.
- Execute Script: In CukeTest, click the Run Script button, and CukeTest will start executing the automation script just recorded. You can see the application under test being automatically launched, and all steps will be executed sequentially.
- Check Playback Effect: Observe whether every step is executed correctly during playback. If there are any exceptions, you can fine-tune the recorded script.
- Adjust Operation Speed: Script playback might be a bit slow because "Slow Motion" mode is enabled by default. You can speed it up by modifying the
slowMoparameter in the script. Setting it to0allows the automated test to run at maximum speed.
Sample Script
Below is a sample script generated by CukeTest recording:
const { RunSettings, Util } = require("leanpro.common");
const { WinAuto } = require("leanpro.win");
(async () => {
   await RunSettings.set({slowMo: 1000, reportSteps: true});

   let modelWin = WinAuto.loadModel(__dirname + "/recording.tmodel");

   //Launch application "notepad.exe"
   await Util.launchProcess("C:\\Program Files\\LeanPro\\CukeTest\\bin\\notepad.exe");

   //Set control value to "Hello CukeTest!"
   await modelWin.getEdit("QTextEdit").set("Hello CukeTest!");

   //Check property
   await modelWin.getEdit("QTextEdit").checkProperty("Text.text", "Hello CukeTest!");

   //Click "Font"
   await modelWin.getButton("Font").click();

   //Select list item "36"
   await modelWin.getList("QFontListView").select("36");

   //Click "OK"
   await modelWin.getButton("OK").click();

   //Check screenshot image
   await modelWin.getVirtual("QTextEdit_image").checkImage();

   //Click "Close"
   await modelWin.getButton("Close").click();


})();
import os
from leanproAuto import RunSettings, WinAuto, Util
def recording():
RunSettings.set({"slowMo": 1000, "reportSteps": True})
modelWin = WinAuto.loadModel(os.path.dirname(os.path.realpath(__file__)) + "/recording.tmodel")
#Launch application "notepad.exe"
Util.launchProcess("C:\\Program Files\\LeanPro\\CukeTest\\bin\\notepad.exe")
#Set control value to "Hello CukeTest!"
modelWin.getEdit("QTextEdit").set("Hello CukeTest!")
#Check property
modelWin.getEdit("QTextEdit").checkProperty("Text.text", "Hello CukeTest!")
#Click "Font"
modelWin.getButton("Font").click()
#Select list item "36"
modelWin.getList("QFontListView").select("36")
#Click "OK"
modelWin.getButton("OK").click()
#Check screenshot image
modelWin.getVirtual("QTextEdit_image").checkImage()
#Click "Close"
modelWin.getButton("Close").click()
if __name__ == "__main__":
recording()4. Integrate Automation Test Cases with Code
In the files generated by recording, besides the script file, you will also see a .tmodel file and a folder with the same name. During recording, CukeTest automatically saves information of all involved controls into these Model Files, allowing us to reuse this control information and improve script flexibility and maintainability.
To make automated testing more efficient and scalable, we usually need to integrate these recorded scripts with a test framework to form a complete test project. CukeTest supports multiple test frameworks, and you can choose a suitable one according to your actual needs:
- Writing Test Scenario Files: Create descriptive scenarios to make test content more intuitive.
- Developing BDD Projects with JavaScript: Suitable for BDD (Behavior Driven Development) testing scenarios.
- Developing BDD Projects with Python: Build BDD projects in a familiar Python environment.
- Developing Pytest Projects: Classic test framework for Python users.
Converting Recorded Scripts to Scenario Files
CukeTest also offers the function to Convert Recording to Scenarios/Step Definitions, helping you quickly convert recorded JavaScript or Python scripts into scenario files and step definition files that comply with Cucumber and pytest-bdd syntax. This conversion method saves part of the manual writing work and helps you intuitively understand the syntax of Cucumber and pytest-bdd, making it easier to get started with BDD testing.
Through the above steps, you have completed the recording and initial integration of your first automation script. As your proficiency improves, you can try designing more complex test cases.