Windows Recording Options
CukeTest provides recording capabilities for Windows desktop applications, allowing users to capture actions and generate automation scripts.
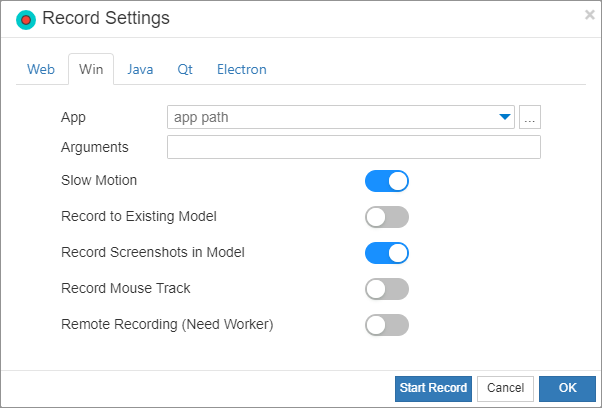
Windows Applications
Here, you need to specify the path of the Windows application you want to record. Typically, this will be an executable file (*.exe), but it can also be a batch file (*.bat). Make sure the path you enter is correct so that CukeTest can successfully launch and record the target application.
In the Application field, specify the executable file path of the Windows application under test. When recording starts, if the path is specified, the application will automatically launch. You can also leave it blank and manually start the application via the menu “Tools” -> “Launch Application...” after recording begins. In either case, the corresponding Windows application launch code will be generated in the recorded script.
If you manually open the Windows application before starting recording, the script will not include code to launch the application.
Command Line Arguments
In the Arguments field, you can specify command-line parameters for launching the target application. These parameters provide runtime information to the application, such as opening a specific file or applying a particular configuration. For example, to open a specific text file in Notepad, you can pass the file path as follows:
notepad.exe some_text_file.txt
Slow Motion
The slow motion option adds a delay between actions during playback. This is particularly useful for observing and debugging recorded scripts. Enabling this option adds the slowMo setting to the generated script, with a default value of 1000 milliseconds (i.e., 1 second per action).
In the script, it is set as follows:
const { RunSettings } = require("leanpro.common");
RunSettings.slowMo = 1000;
from leanproAuto import RunSettings
RunSettings.set({"slowMo": 1000})Record to Existing File
If you do not want to create a brand new recording but wish to append or continue recording based on previous results, you can use this option. After checking it, you need to fill in the following two options in the popup window:
Model File: Append the generated control model to the selected model file *.tmodel instead of creating a new one.
Script File: Append the generated script to the selected script file (Python or JavaScript) instead of creating a new script file.
Capture Control Screenshots
Generate screenshots of the operated controls. These screenshots can be clicked on in the model manager to view each control (the container of the operated control will not be captured). This helps quickly locate the operated control during debugging by checking the control screenshots.
Record Mouse Trajectory
When enabled, the recording process will log the mouse trajectory and reproduce the movement path during playback. This is useful for test scenarios that require precise mouse operation, such as drawing or dragging actions.
Remote Recording
CukeTest supports Windows remote recording. Enabling this option and clicking Start Recording will open the "Connect to Remote Execution Station" dialog. You can enter the address of the remote endpoint and start recording remotely. For more details, see Remote Recording.