Gui Text
What if the position of the specified text in the control needs to be manipulated, but the text cannot be recognized as a control? Maybe GuiText can help you solve this problem.
As the name suggests, Gui Text is a way of operating text as a control object. Its implementation starts from the underlying mechanism of graphics rendering, and realizes further and more precise positioning by positioning the text position on the existing control tree.
Add GuiText
Like other test objects, Gui Text objects are also detected, identified and managed in the model manager. After opening the model file or the model manager, you can click "Spy Gui Text" (located in the drop-down list of the "Spy Windows Object" button in the model manager toolbar) to enter the detection of the text object.
edit properties
At present, Gui Text has one and only one identification attribute—text, but this attribute supports regular expression matching. For details, please refer to Object Detail Page Operations.
edit parent node
Gui Text has requirements for direct container controls, so editing of the parent control of Gui Text needs to be carefully modified. If the nearest container control of Gui Text (such as Pane, Window, Tree, Menu, etc.) is deleted, Gui Text will not be recognized correctly.
API for Gui Text
Type definition for Gui Text
export interface IGuiTextControl {
    click(x?: number, y?: number, mousekey?: number): Promise<void>;
    dblClick(x?: number, y?: number, mousekey?: number): Promise<void>;
    exists(seconds?: number): Promise<boolean>;
    highlight(duration?: number);
    moveMouse(x?: number, y?: number, seconds?: number): Promise<void>;
    rect(): Promise<Rect>;
    text(): Promise<string>;
    takeScreenshot(filePath?: string): Promise<string>;
    modelImage(options?: {encoding: 'buffer' | 'base64'}): Promise<string | Buffer>;  //base64 is the default
    modelProperties(all?: boolean): {[x: string]: any};
}
operation method
click(x, y, mousekey): Promise<void>
The mouse clicks the control, and the relative position (offset) of the click and the mouse button used can be modified by passing in parameters.
- x:
number, the click position is relative to the horizontal pixel point of the upper left corner of the control,0represents the horizontal midpoint position of the control, and the default value is0; - y:
number, the click position is relative to the vertical pixel point of the upper left corner of the control,0represents the vertical midpoint position of the control, and the default value is0; - mouseKey: MouseKey type, the mouse key to operate, the default is
1, which is the left mouse button.
dblClick(x, y, mousekey): Promise<void>
Double click on the control, called in the same way as the click() method, modifies the relative position (offset) of the click and the mouse button used by passing in parameters.
- x:
number, the click position is relative to the horizontal pixel point of the upper left corner of the control,0represents the horizontal midpoint position of the control, and the default value is0; - y:
number, the click position is relative to the vertical pixel point of the upper left corner of the control,0represents the vertical midpoint position of the control, and the default value is0; - mouseKey:
MouseKeytype, the mouse key to operate, the default is1, which is the left mouse button.
moveMouse(x, y): Promise<void>
Move the mouse cursor to the relative position of the control, and move to the center of the control by default.
- x:
number, the click position is relative to the horizontal pixel point of the upper left corner of the control,0represents the horizontal midpoint position of the control, and the default value is0; - y:
number, the click position is relative to the vertical pixel point of the upper left corner of the control,0represents the vertical midpoint position of the control, and the default value is0;
exists(time): Promise<boolean>
Check whether the control exists, and the input parameter is the maximum waiting time (timeout) for checking. The default call will only check once without retrying or waiting.
- time:
number, the timeout time, the unit is seconds, when it is 0, it will not retry and wait, and the default parameter is0. - returns: Asynchronously returns whether the control exists,
truemeans it exists,falsemeans it does not exist.
pressKeys(keys, options?): Promise<void>
Enter a key or character string, and focus on the target control before inputting. When a string is passed in, some special characters (^+~%{}()) in the string will be executed as control keys (Shift key, CTRL key, etc.) For the corresponding symbols, please refer to Appendix: Key Codes for details. If you want to enter plain text, ignoring these control key symbols, you can use the {textOnly: true} option and call it like this: pressKeys(str, {textOnly: true}).
- keys:
stringtype, the key, key combination or string to be input, up to 1024 characters are supported. - options: (Optional) Some optional parameters that control the input mode.
- textOnly: Enter only character strings, and also enter control characters as text. The effect is equivalent to calling
Keyboard.typeString().
- textOnly: Enter only character strings, and also enter control characters as text. The effect is equivalent to calling
- cpm: the number of input characters per minute, used to control the speed of text input. It is recommended to set the
cpmvalue above 200 for automatic operation. Due to the internal implementation of the method and the different processing of text input by various systems and applications, the actual input speed may not reach the setcpm. When options is a number, it is equivalent to the cpm parameter. - returns: An asynchronous method that returns no value. For more instructions or examples, please refer to Simulating Keyboard Operations.
takeScreenshot(filePath): Promise<string>
The screenshot of the control, you can pass in the path to save the screenshot to the path location.
- filePath: (optional)
string, the save path and file name of the screenshot, such as"./images/screenshot1.png". - returns: Asynchronously returns the
base64string of the screenshot.
modelProperties(): Promise<object>
Get the model properties of the target control, that is, the properties of the corresponding model object (recognition properties and other properties).
- returns: Asynchronously returns an object
objectconsisting of properties of the target model object.
modelImage(options?: {encoding: 'buffer' | 'base64'}): Promise<string>
Get a cached screenshot of the control in the model manager.
If you call the
modelImage()method on an object returned by Descriptive Mode, an error will be reported.
- returns: Asynchronously return the
Bufferobject orbase64string of the screenshot of the target control.
property method definition
It should be noted that the property methods of the control are asynchronous. After calling, CukeTest will communicate with the target control to obtain the current property of the control, that is, the real-time property, rather than the identification property in the model object. The properties listed below are supported by all controls, but not all have values. You can try similar property methods to obtain the target properties according to the suggestions.
text(): Promise<string>
Text information of Gui Text.
When using regular expressions to match Gui Text, you can also get the full text.
- returns:
stringtype, asynchronously returns the text of the target Gui Text.
rect(): Promise<Rect>
The control's description rectangle.
- returns: Shared Object API, asynchronously returns an object containing
x,y,heightandwidthinformation of the control.
TextTable Object (TextTable)
When you need to manipulate multiple text objects located under the same control, the TextTable Object (TextTable) provides an efficient solution. If multiple sibling text objects are identified under a target Windows control, CukeTest will provide a special node in the recognition results - the TextTable object (TextTable). By adding this object to the control tree, you can use it like a table to achieve centralized management and operation of multiple text objects.
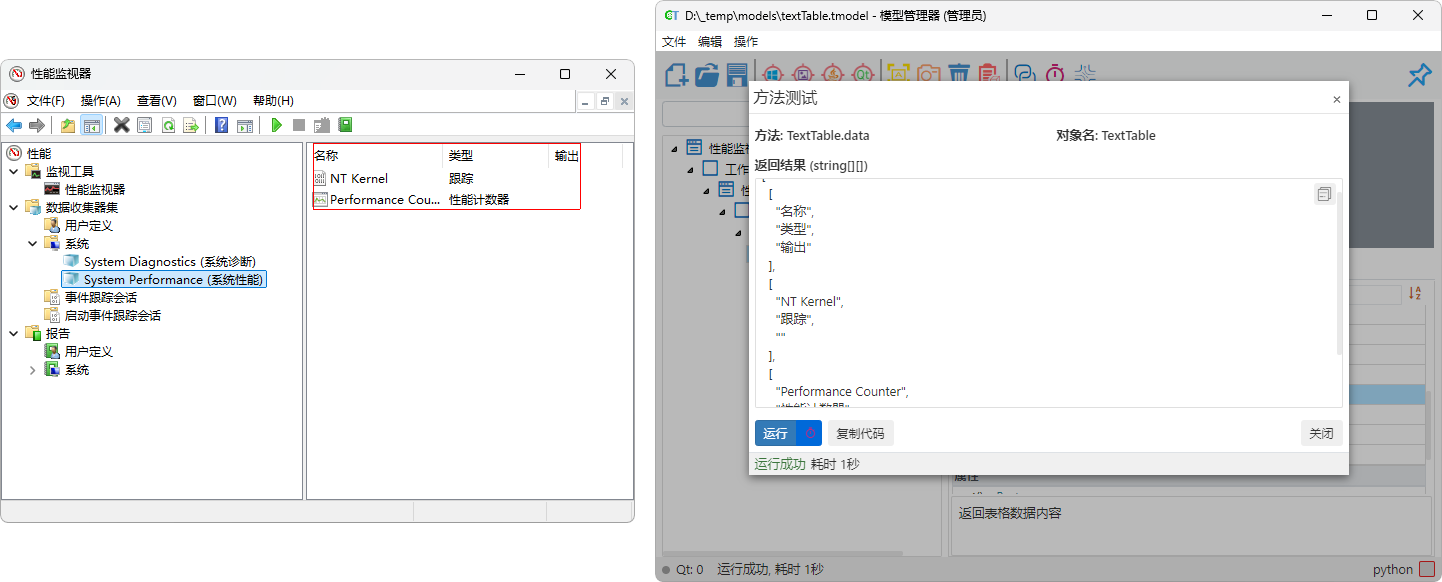
Add Text Table Object
When identifying multiple sibling text objects in the Model Manager, CukeTest will automatically provide the option to add a Text Table object. After selecting "Add Text Table Object", CukeTest organizes these sibling text objects into a table structure, facilitating your subsequent test operations.
In this way, you can avoid operating each text object individually, but access the required content directly through rows and columns. For example:
- Click a specific cell.
- Get the text content of a cell.
- Verify the correctness of the cell text.
- Search and compare data in the table.
Header Settings
When processing table data, the first row of the table is sometimes used to display column headers instead of actual data content. To allow CukeTest to correctly identify the table structure, you can configure it using the header property:
header: false(Default behavior): The first row is treated as a regular data row. This means that all rows are treated as data, and the index starts from the first row.header: true(Enable header): Identifies the first row of the table as a header (column title), and actual data starts from the second row. Under this setting:data()method: Returns only data rows, excluding the header row. This allows you to operate directly on actual data without manually skipping the header.- Operation methods (such as
clickCell(),cellValue()androwData()): When using row indexes, these methods will use the first row of data as the starting point of the index, and the header row will not be included in the index calculation. For example, if a header exists, the first row of data corresponds to index0, and the header occupies no index position.
Clip Recognition Area
When using TextTable, you may only need to process some data in the table. The Clip Recognition Area function can help you precisely specify the table range to be identified by setting the clip property, thereby focusing on the concerned part.
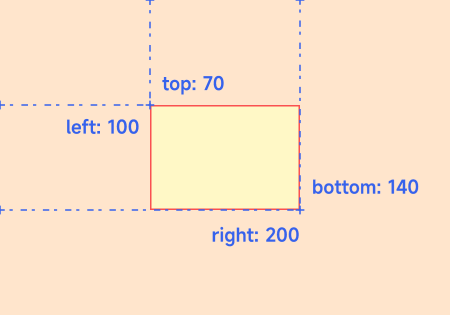
How to use the clip property
You can pass an object to the clip property and set one or more of the following parameters as needed to control the boundary of the recognition area:
left: The number of pixels from the left side of the table to the left side of the target recognition area.top: The number of pixels from the top of the table to the top of the target recognition area.right: The number of pixels from the left side of the table to the right side of the target recognition area.bottom: The number of pixels from the top of the table to the bottom of the target recognition area.
Note: The clipping area is calculated from the upper left corner (origin) of the table.
leftandtopdefine the starting point of the upper left corner of the clipping area, andrightandbottomdefine the boundary of the lower right corner.The clipped area depends on the actual width of the text in the application, and the clipping area may change due to changes in text content. Therefore, in actual operation, you may need to adjust the size of the clipping area according to the actual situation to ensure that the required content can be fully identified.
By setting these parameters simultaneously, you can define a rectangular area and only identify the content within that area.
Example Explanation
Clip content in the lower right corner
{ left: 147, top: 98 }Explanation: This setting indicates that the left side of the recognition area is 147 pixels away from the left side of the table, and the top is 98 pixels away from the top of the table. This will only keep the lower right part and ignore other areas.
Clip left content
{ right: 147 }Explanation: This setting indicates that the right side of the recognition area is 147 pixels away from the left side of the table. This will only keep the left part and ignore the right content.
Define a rectangular area
{ left: 100, top: 70, right: 200, bottom: 140 }Explanation: This setting defines a rectangular recognition area:
- Left margin is 100 pixels from the left side of the table
- Top margin is 70 pixels from the top of the table
- Right margin is 200 pixels from the left side of the table
Bottom margin is 140 pixels from the top of the table
Thus, only content located within this rectangular area will be identified.
Edit Parent Node
Be careful when editing the parent node of a Text Table object, because the Text Table object has specific requirements for its direct container control. If the nearest container control (such as Pane, Window, Tree, Menu, etc.) of the Text Table object is deleted, the object may not be recognized correctly.
Usage Example
Suppose you are testing an application containing multiple contact information, where each contact's information (such as name, phone, email, etc.) is displayed in a list. By adding a Text Table object, you can easily verify the contact information for each row in the list, or look up information for a specific contact.
let textTable = await model.getTextTable("ContactsList");
let contactInfo = await textTable.cellValue(1, 2); // Get text of row 1, column 2 (assuming phone number)
console.log(`Contact Phone: ${contactInfo}`);
// Perform other text verifications or operations...
textTable = model.getTextTable("ContactsList")
contactInfo = textTable.cellValue(1, 2) # Get text of row 1, column 2 (assuming phone number)
print(f"Contact Phone: {contactInfo}")
# Perform other text verifications or operations...Text Table Object API
Type Definition
export interface ITextTable extends ITextGuiText {
    clickCell(rowIndex: number, columnNameOrIndex: string | number): Promise<void>;
    cellValue(rowIndex: number, columnNameOrIndex: string | number): Promise<string>;
    columnName(index: number): Promise<string>;
    columnHeaders(): Promise<string[]>;
    columnCount(): Promise<number>;
    data(): Promise<string[][]>;
    rowCount(): Promise<number>;
    rowData(rowIndex: number): Promise<string[]>;
}
class TextTableControl(ControlBase):
def clickCell(rowIndex: int, columnNameOrIndex: Union[str, int]) -> None
def cellValue(rowIndex: int, columnNameOrIndex: Union[str, int]) -> str
def columnName(index: int) -> str
def columnHeaders() -> List[str]
def columnCount() -> int
def data() -> List[List[str]]
def rowCount() -> int
def rowData(rowIndex: int) -> List[str]Operation Methods
- clickCell(rowIndex: number, columnNameOrIndex: string | number)
- cellValue(rowIndex: number, columnNameOrIndex: string | number)
- columnName(index: number)
- columnHeaders()
- columnCount()
- data()
- rowCount()
- rowData(rowIndex: number)
data(): Promise<string[][]>
Get all content in the table and return it as a two-dimensional array.
- Returns:
Promise<string[][]>type, a two-dimensional string array.
Suppose the table data is as follows:
| ID | Name | Gender |
|---|---|---|
| 0001 | Wang | Male |
| 0002 | Ming | Male |
| 0003 | Red | Female |
Then the array returned by the data() method is as follows:
[
    ['0001', 'Wang', 'Male'],
    ['0002', 'Ming', 'Male'],
    ['0003', 'Red', 'Female']
]