Creating Virtual Controls
In automated testing, Virtual Controls are used to define specific areas on the interface so that they can perform operations such as clicking, OCR recognition, or image comparison like regular controls.
Depending on the usage scenario, virtual controls can be created in the following three ways:
| Creation Method | Description | Applicable Scenario |
|---|---|---|
| Define in Model | Predefine virtual controls in the model file via Model Manager, reusable across multiple scripts. | Fixed controls that need to be reused across multiple scripts. |
| Descriptive Mode Creation | Dynamically specify area coordinates or identifying characteristics in the script to instantly generate virtual control instances. | Temporary processing, dynamic interface objects, independent of model files. |
| Controls' Virtualize | Generate a virtual control with the same area directly from an existing real control. | When OCR or image comparison is needed for the entire control area. |
Regardless of the method used, virtual controls provide a consistent interface for usage, capable of performing operations like clicking, text recognition, screenshots, or image comparison. For detailed methods, please refer to Virtual Control API.
Create in Model Manager
Creating virtual controls in the Model Manager is the most common way. Through the visual interface, you can directly draw the virtual control area on the control screenshot, or batch adjust properties of multiple virtual controls in the editing window. This method is particularly suitable for application scenarios with stable interface structures and fixed element layouts.
1. Create Virtual Control on Screenshot
After selecting a recognized control in the Model Manager, switch to the screenshot page of that control. Click the "Add Virtual Control" button in the toolbar, then drag the mouse in the control screenshot area to draw the area of the virtual control. After drawing, the system will automatically add this area as a new virtual control.
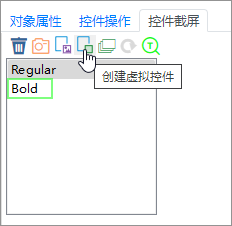
This method is intuitive and fast, suitable for quickly supplementing one or two virtual controls on an existing control. For example, when a control contains custom-drawn buttons or icons, simply defining virtual controls for these areas allows you to click or identify them directly in the test script.
2. Batch Create and Adjust via Advanced Editor
If you need to edit multiple virtual controls at once, you can click "Edit Virtual Control" on the control screenshot page to open the virtual control editing window. In this window, you can batch add, delete, or adjust virtual controls, and set properties such as name and alignment for each control, facilitating subsequent script calls and interface adaptation.
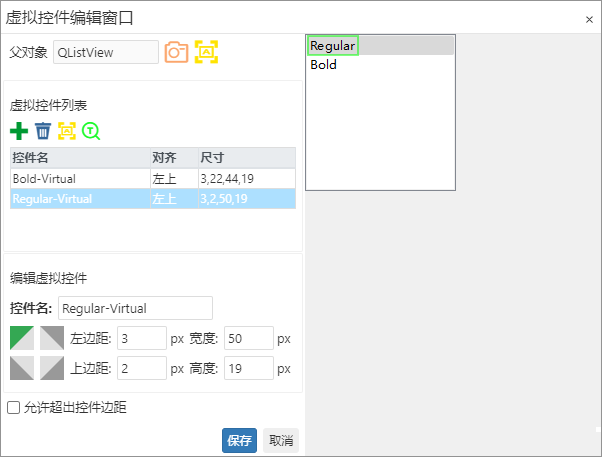
Through the advanced editor, you can unify the adjustment of areas and positions of multiple virtual controls in the same view, which is particularly convenient for interfaces with dynamic layouts or scalable windows.
Example Scenario: Custom Icon Interface
The example below shows a Qt application interface named appchooser. In this interface, when a user clicks an icon, the icon zooms in and is displayed in the center. To implement automated testing for this interaction scenario, virtual controls can be defined through the following steps:
Identify Window Control
First, identify the entire window control in the Model Manager. For example, the type of this window isCustom. After identification, the window object will be displayed in the object tree, and subsequent virtual controls will belong to this object.Edit Virtual Control
Right-click the identified window object in the Model Manager, select "Edit Virtual Control" to open the virtual control editing window. In the editing window, you can define a corresponding virtual control for each interactive area.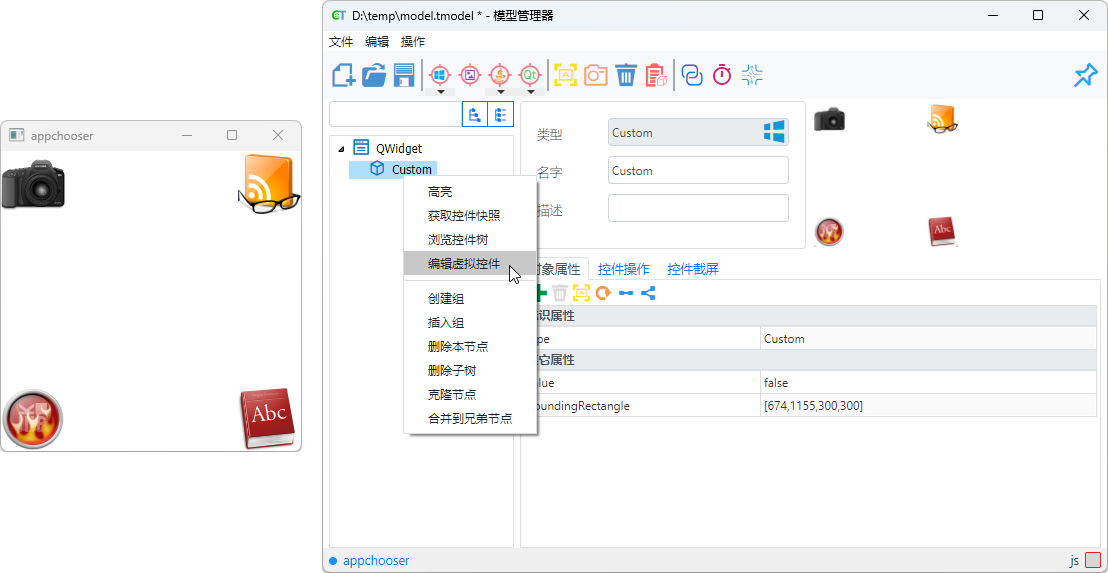
Add and Configure Virtual Controls
In the editing window, perform the following operations sequentially:- Add Control
Create four virtual controls, namedCamera,Glass,Ball, andBook, corresponding to the four icon areas in the interface. - Define Area
Use the mouse to box select the area corresponding to each icon to determine the rectangular boundary of the virtual control. Set Alignment
Specify suitable alignment for each virtual control. For example, set theBookcontrol to "Bottom Right Alignment", so that when the window size changes, this control can still accurately locate the "Book" icon in the bottom right corner.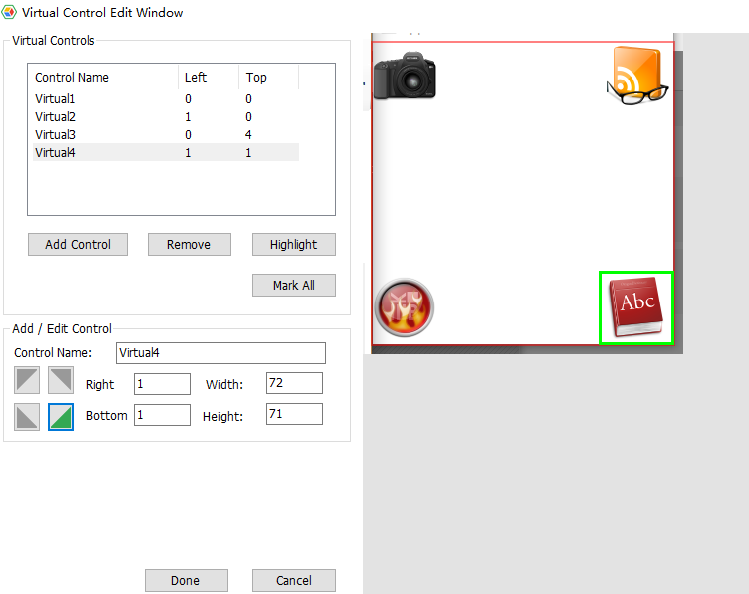
- Add Control
Save Configuration
After editing is complete, click "OK" to save the settings. When returning to the Model Manager, you can see that the newly added virtual controls have appeared in the object structure as child nodes of the window control.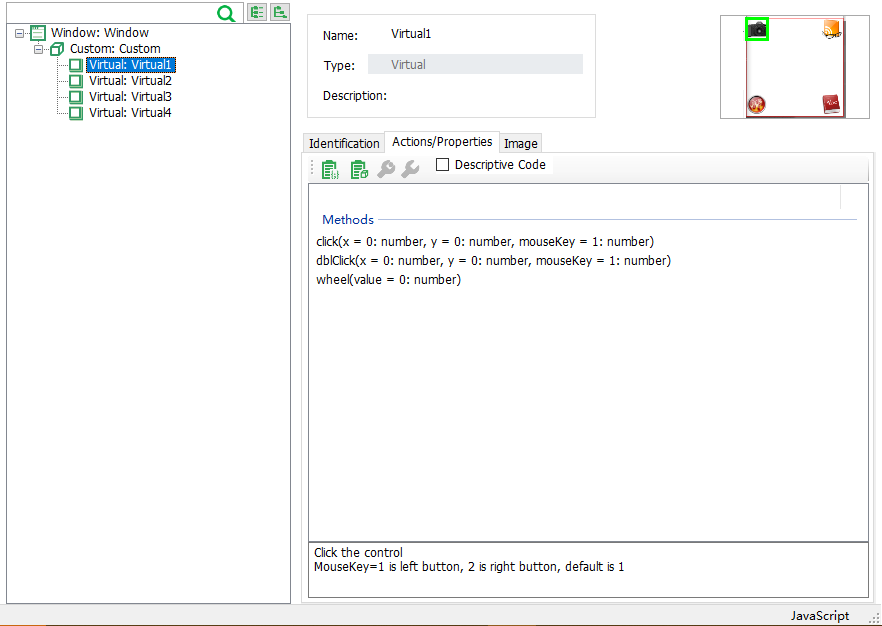
After completing the above steps, you can use these virtual controls in scripts just like operating regular controls. For example:
await model.getVirtual("Camera").click();model.getVirtual("Camera").click()When executing the script, the system will automatically locate and click the Camera virtual control without calculating coordinates or performing additional image recognition, thus simplifying script writing and maintenance.
Advanced Usage: Identify and Locate by Text
In some interfaces, although controls cannot be recognized in a standard way, the text within them can often be accurately extracted through OCR technology.
Virtual controls support a text-content-based positioning method. Simply add the text property to the identification properties to automatically find and locate the target area based on text content.
Working Principle
When a virtual control contains the text property, the tool executes the following process:
- Call
textItems()within the area of the virtual control to identify all text blocks; - Iterate through the recognized text content and filter out items matching the
textproperty value; - By default, return the first matching virtual control instance.
If you wish to get multiple matching results simultaneously, you can call the all() method to return a list of virtual controls corresponding to all text blocks that meet the conditions.
Usage Example
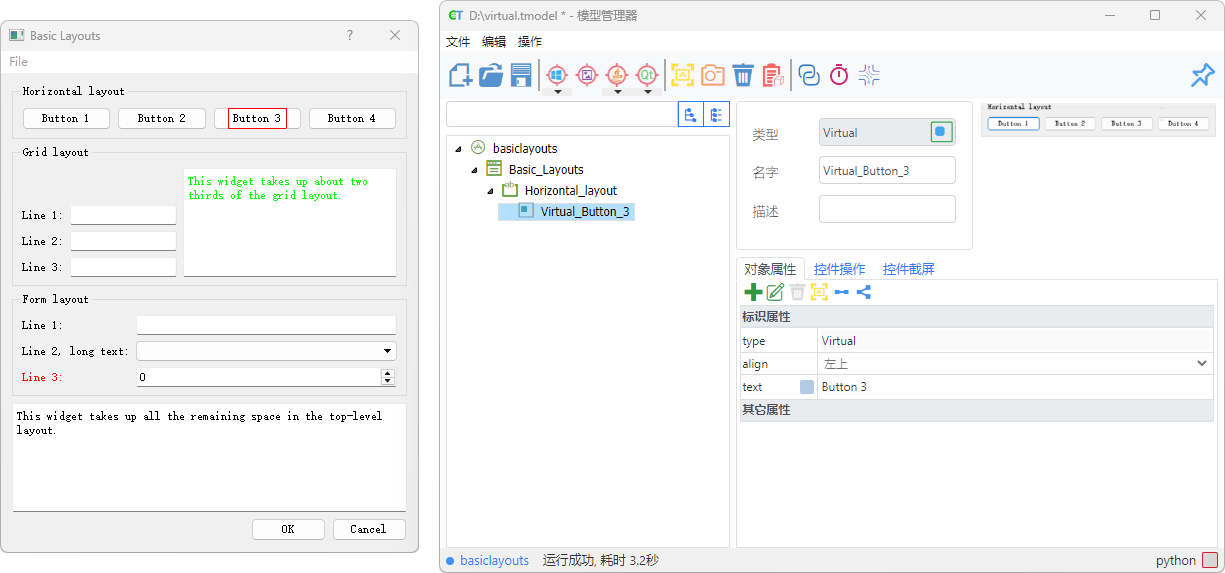
The following example demonstrates how to virtualize a control and use the text property to get all areas containing the text "Button", and then perform operations sequentially:
// 1. Operate a virtual control defined in the model
await model.getVirtual("Virtual_Button_3").highlight()

// 2. Based on an existing virtual control, override or supplement identification properties
await model.getVirtual("Virtual_Button_3", { "text": "Button 3" }).highlight();

// 3. After virtualizing the control, get all text blocks containing "Button" text and highlight them sequentially
let buttons = await model.getGeneric("Horizontal_layout").getVirtual({ "text": "Button" }).all();
for (const btn of buttons) {
    await btn.highlight();
}
# 1. Directly operate a virtual control defined in the model
model.getVirtual("Virtual_Button_3").highlight()
# 2. Based on an existing virtual control, override or supplement identification properties
model.getVirtual("Virtual_Button_3", { "text": "Button 3" }).highlight()
# 3. After virtualizing the control, find all text blocks containing "Button" and highlight them sequentially
buttons = model.getGeneric("Horizontal_layout").getVirtual({ "text": "Button" }).all()
for btn in buttons:
btn.highlight()Applicable Scenarios
Text-based virtual control lookup is particularly useful in the following situations:
- Custom-drawn or non-standard controls cannot be directly recognized, but text content is stably visible;
- Need to batch process multiple similar text elements (such as a group of buttons, labels, or menu items);
- Interfaces with accurate OCR recognition and regular text layout;
This method enables flexible text positioning and batch operations without modifying the model structure, balancing maintainability and dynamic adaptability.