Walkthrough: Recording CukeTest Itself Using CukeTest
Did you know? CukeTest itself is an application developed using Electron technology. This means you can use CukeTest's Electron recording feature to create automated test scripts for CukeTest itself.
This is not only an interesting fact but also an excellent exercise to help you quickly master automated testing skills for Electron applications.
Preparation
Before starting recording, please complete two simple preparations.
1. Create a New Project
First, create a new empty project in CukeTest to store the scripts we are about to record.
2. Check Zoom Level
To ensure the accuracy of recording coordinates, it is recommended to restore CukeTest's display zoom level to 100% before recording.
- Operation Path: In the CukeTest top menu bar, select View -> Actual Size.
If other Electron applications you are testing do not support adjusting zoom on the interface, you can enter
--force-device-scale-factor=1in the "Command Line Arguments" of the recording settings to force the application to launch at 100% scale.
Recording Steps
Once ready, let's start recording.
- Click the drop-down arrow next to the "Record" button on the toolbar and select Recording Settings.
In the pop-up panel, configure as follows:
- Type: Select
Electron. - Electron Application Path: Select the executable file of CukeTest. The default path is
C:\Program Files\LeanPro\CukeTest\Cuke.exe.
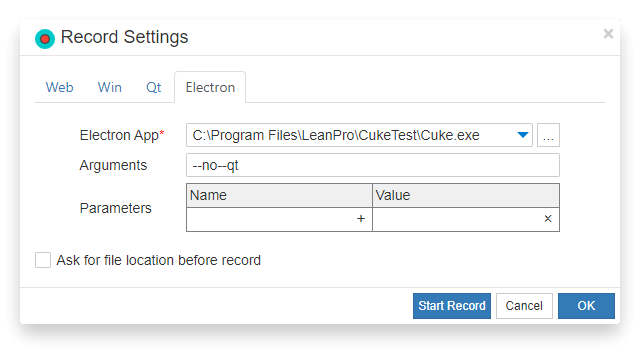
- Type: Select
- Click the Start Recording button. CukeTest will launch a new controlled instance, and your operations on the new instance will now be recorded.
Points to Note During Recording: Handling Native UI
During the recording process, you will find that not all operations are recorded.
- Recordable: All click, input, and other operations within the CukeTest main window interface (e.g., clicking the settings button, switching themes, modifying options, etc.).
- Cannot be directly recorded: Native operating system dialogs popped up from the main window, such as the file selector that appears after clicking "Open Project".
This is a normal phenomenon for Electron recording. For these native UI operations, you need to use the Step-by-Step Recording and Script Integration strategy mentioned earlier. For details, please refer to Handling Native UI: Hybrid Recording Strategy.
Script Result
When you stop recording, CukeTest will automatically generate the corresponding automation script. Below is an example script for recording "Open Settings -> Change Language and Theme -> Save" operations:
const { _electron: electron } = require('leanpro.web');

(async () => {
    const browser = await electron.launch({
        args: [''],
        executablePath: 'C:\\Program Files\\LeanPro\\CukeTest\\cuke.exe',
        timeout: 40000
    });

    const page = await browser.firstWindow();

    // Click "Settings" button
    await page.getByRole('button', { name: 'Settings Configure Settings' }).click();

    // Switch Language and Theme
    await page.locator('#settings_code_lang').selectOption('py');
    await page.locator('#color_theme').selectOption('dark');

    // Switch to "Advanced" tab
    await page.getByRole('tab', { name: 'Advanced' }).click();
    await page.locator('div:nth-child(6) > .col-sm-2 > .cuketest-switch').click();

    // Click "Save" button
    await page.locator('#btnSaveSettings').click();

    await browser.close();
})();
from leanproWeb import WebAuto
def run(webauto: WebAuto) -> None:
browser = webauto.electron.launch(args=[""], executable_path="C:\\Program Files\\LeanPro\\CukeTest\\cuke.exe", timeout=40000)
page = browser.firstWindow()
# Click "Settings" button
page.get_by_role("button", name="Settings Configure Settings").click()
# Switch Language and Theme
page.locator("#settings_code_lang").select_option("py")
page.locator("#color_theme").select_option("dark")
# Switch to "Advanced" tab
page.get_by_role("tab", name="Advanced").click()
page.locator("div:nth-child(6) > .col-sm-2 > .cuketest-switch").click()
# Click "Save" button
page.locator("#btnSaveSettings").click()
browser.close()
with WebAuto() as webauto:
run(webauto)Explore Complete Sample Project
The walkthrough in this article is just a start. CukeTest has a built-in more complete Sample Project, which not only contains scripts generated by Electron recording but also demonstrates how to combine Windows automation to operate file dialogs, achieving true End-to-End automation.
You can easily find and open it via CukeTest's Welcome Page or the menu bar Help -> Samples for deeper learning.